Build Your Own Herb Spiral: Maximize Herbs in Small Spaces
Are you dreaming of a bountiful herb garden but feel limited by a small backyard, patio, or even a balcony? The good news is, you don't need acres of land to grow a diverse array of fresh herbs. Enter the
herb spiral – an ingenious, space-saving design that allows you to cultivate a wide variety of herbs, each thriving in its ideal conditions, all within a compact footprint. This permaculture marvel is not just a practical solution; it's also an attractive feature that can become the focal point of your outdoor space.
What Exactly is an Herb Spiral and Why Do You Need One?
An
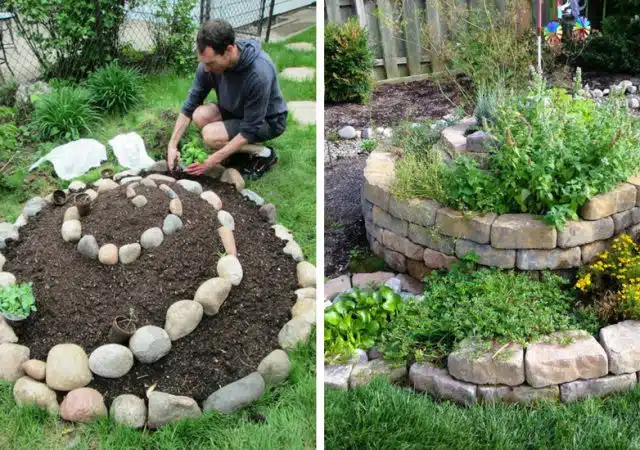
herb spiral is a three-dimensional garden bed that rises in a gentle spiral from the ground up, typically constructed from bricks, stones, or other natural materials. Its clever design creates a series of microclimates, meaning different zones with varying levels of sun exposure, moisture, and temperature, all within a surprisingly small area. Imagine a miniature mountain range for your herbs!
The beauty of the
herb spiral lies in its ability to cater to the diverse needs of your culinary and medicinal plants. As you ascend the spiral:
- The Top: This area is the highest, sunniest, and driest, mimicking the arid conditions preferred by Mediterranean herbs.
- The Middle: Moving down, you'll find moderately sunny and moist conditions, suitable for a broader range of generalist herbs.
- The Bottom: The base of the spiral is the coolest, shadiest, and moistest, perfect for herbs that enjoy consistently damp soil.
Beyond just creating varied conditions, the materials used (like bricks or stones) absorb solar energy during the day and slowly release it overnight, providing a thermal boost to your plants. This smart design means you can grow herbs like sun-loving rosemary and moisture-loving parsley side-by-side, yet in their optimal environments. It's a significant advantage over flat beds or individual containers, often requiring less watering and far less space for the volume of herbs it produces. Many gardeners find that a
DIY herb spiral, even one measuring just five feet by five feet, can host an incredible array of herbs that would typically require a much larger conventional garden.
Designing Your Dream Herb Spiral: Location and Layout
Before you even lay the first brick, thoughtful planning is key to a successful and productive
herb spiral.
Choosing the Perfect Location
The most crucial factor for your
herb spiral is sun exposure. Most herbs thrive in full sun, so select a spot that receives at least 6-8 hours of direct sunlight daily. Ideally, choose a location that also offers:
- Convenience: Proximity to your kitchen door is invaluable for quick harvests while cooking.
- Visibility: An herb spiral is a beautiful, sculptural element. Place it where you can enjoy its aesthetics and easily access it. It’s often described as a garden conversation piece!
- Drainage: Ensure the chosen area has good natural drainage to prevent waterlogging, especially at the base of your spiral.
Sketching Your Layout and Gathering Materials
While the exact size can vary, a common and effective footprint for an
herb spiral is about five feet wide and five feet long. Begin by marking out this circular or slightly teardrop-shaped base on the ground. You can use string and stakes or even a garden hose to visualize the footprint.
For construction, the most recommended materials are:
- Bricks: Old bricks are excellent as they are durable, retain heat well, and can often be sourced affordably or even free through local classifieds or construction sites. Using reclaimed bricks also adds a rustic charm and sustainability to your project.
- Stones: Natural stones or rocks of various sizes can also be used, offering an organic, natural look. Ensure they are stable and can be stacked securely.
Avoid simply mounding soil and placing decorative stones on top. This method is prone to erosion and won't provide the structural integrity or microclimate benefits of a solidly built spiral. The goal is a stable, retaining wall structure that will hold your soil in place for years to come. Other non-toxic materials like seasoned wood can also be considered, but ensure they won't leach harmful chemicals into your soil or alter its pH significantly. For more detailed instructions on building with bricks, you might find inspiration in resources like
DIY Herb Spiral Garden: Build with Bricks for Lasting Beauty.
Building Your Herb Spiral: Step-by-Step Guidance
Once you’ve finalized your location and gathered your materials, it’s time to construct your magnificent herb spiral. This doesn't require extensive construction experience, just patience and a sturdy approach.
- Prepare the Base: Clear the chosen area of any weeds, grass, and debris. You might want to lay down a layer of cardboard or weed barrier fabric at the bottom to suppress future weed growth, though some permaculturists prefer to just build directly on prepared soil.
- Start Laying the First Course: Begin at the outermost edge of your marked footprint, laying down your first course of bricks or stones. This will define the base of your spiral. Work inwards and upwards simultaneously. Each layer should be set slightly back from the one below it to create a gentle slope, ensuring stability and a spiral effect.
- Build Up the Walls: Continue stacking your chosen material in a spiral pattern. As you build up, fill the inner chamber with good quality soil and compost mixture. This is not just about filling; the soil provides weight and stability to the structure. Ensure each brick or stone is securely placed and level. You want a solid, sturdy wall that will retain soil and warmth.
- Gradual Ascent: The height of your spiral should increase as you move towards the center, creating the distinct elevation for the microclimates. The top point should be the highest, and the 'path' of the spiral should be wide enough for planting.
- Incorporate Drainage (Optional but Recommended): Some builders incorporate a small drainage ditch or even a small, shallow pond area at the very lowest point of the spiral. This collects excess water and creates an ultra-moist zone for plants like watercress, although it adds a layer of complexity. For a simpler design, focus on good soil drainage throughout.
The process of filling your
herb spiral is crucial. Use a high-quality organic potting mix, amended with plenty of compost. This will provide the necessary nutrients and structure for your herbs to flourish. Don't skimp on this step – healthy soil is the foundation of a healthy garden.
Mastering Herb Placement: Who Goes Where?
Now for the most exciting part: populating your new
herb spiral! Strategic planting is what truly unlocks the potential of this design, allowing you to cultivate a diverse range of herbs with varied environmental preferences.
Here’s a general guide for placing your herbs according to the microclimates you’ve created:
- The Top (Sunny, Dry & Hot Zone): This is prime real estate for sun-loving, drought-tolerant herbs that prefer well-drained soil and Mediterranean conditions.
- Examples: Rosemary, Sage, Thyme, Oregano, Lavender, Marjoram, Stevia.
- Tip: These herbs thrive on neglect when it comes to watering, so resist the urge to overwater them.
- The Middle (Moderate Zone): As the spiral descends, conditions become slightly less intense, with good sun but more consistent moisture.
- Examples: Fennel, Chives, Summer Savory, Calendula, Echinacea, Tarragon.
- Tip: These herbs appreciate regular watering but don't want to sit in soggy soil.
- The Bottom (Shady, Moist & Cool Zone): The base of the spiral typically receives some shade from the taller sections and retains the most moisture.
- Examples: Parsley, Cilantro, Chervil, Sorrel, Mint (with caution – see below!), Lemon Balm (with caution).
- Tip: These herbs love consistently damp soil and may benefit from a layer of mulch to help retain moisture.
A Critical Warning: Avoid Invasive Herbs
While your
herb spiral is incredibly versatile, there's one family of plants you absolutely must avoid planting directly within its confines:
the mint family. This includes well-known varieties like peppermint, spearmint, and lemon balm. Why the exclusion? Mints are notoriously aggressive spreaders. Their root systems will quickly colonize the entire spiral, choking out and outcompeting all your other carefully placed herbs. If you love mint, grow it in its own dedicated pot or container, separate from the main spiral. You can then place the potted mint strategically at the bottom of the spiral to enjoy its moist conditions without it taking over.
By understanding and utilizing these microclimates, your
herb spiral can host an astonishing variety of plants in an efficient and beautiful display. This thoughtful placement is a cornerstone of the concept, enabling diverse growth within minimal space, truly living up to the promise of
The Smart Herb Spiral: Grow Diverse Herbs with Microclimates.
Conclusion
Building your own
herb spiral is a rewarding project that transforms a small patch of ground into a vibrant, productive, and aesthetically pleasing herb garden. It's a testament to smart design, offering a sustainable way to grow a wide array of culinary and medicinal herbs in their preferred microclimates, all while conserving space and water. From the first reclaimed brick to the final herb planted, you'll be creating a living masterpiece that not only provides fresh ingredients for your kitchen but also serves as a beautiful conversation piece in your garden. Embrace the challenge, get creative, and enjoy the bounty your herb spiral will bring!